Complete RimWorld Medical Guide: Treatment & Surgery
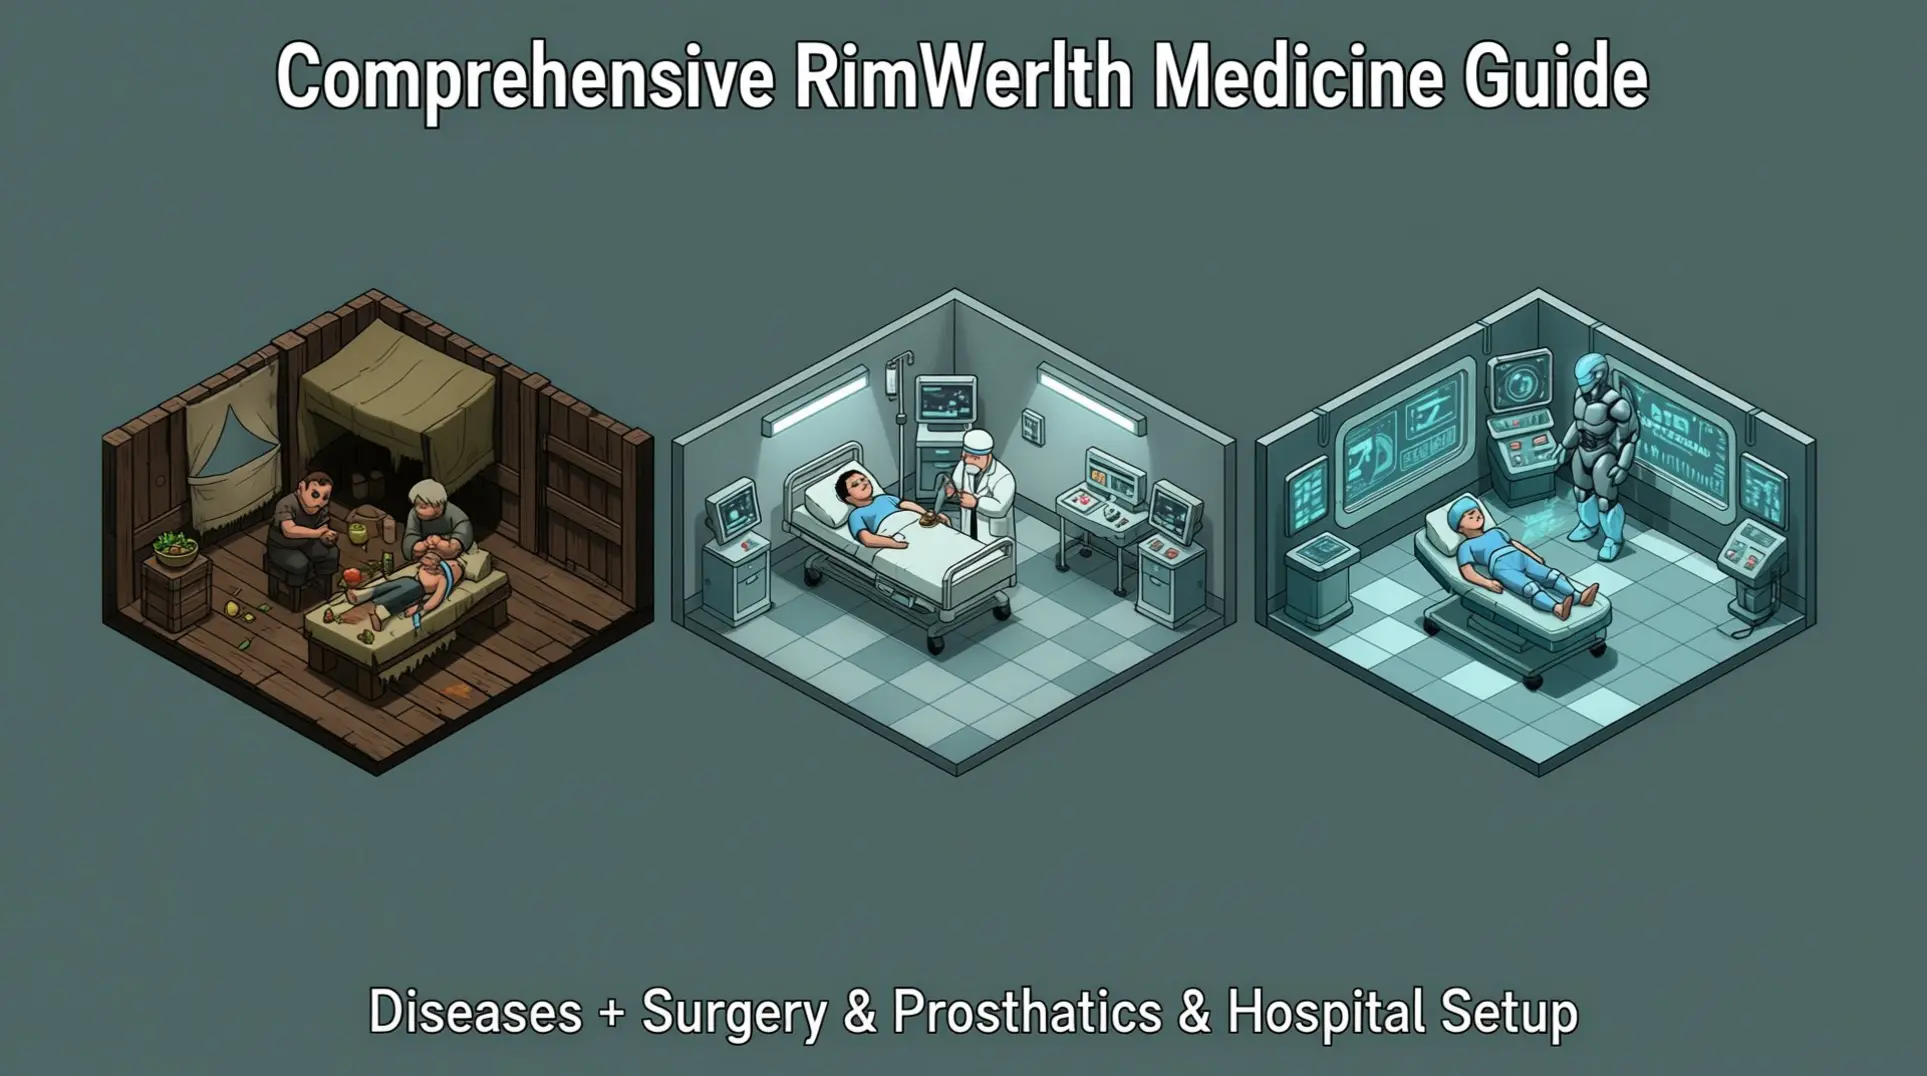
Medical skill is the foundation of RimWorld medical care, with higher skill levels increasing treatment quality, surgery success chance, and healing speed. Disease treatment operates as a race between infection percentage and immunity percentage, where immunity must reach 100% before infection does to ensure survival. Tend quality, which determines disease outcomes, is influenced by the doctor's skill, medicine quality, bed quality, and nearby vitals monitors. Surgery success depends on multiple factors including doctor skill, medicine type, lighting, and room cleanliness, with industrial or glitterworld medicine strongly advised for surgical procedures. To maximize recovery speed and reduce disease risk, stock high-quality medical beds and vitals monitors in the hospital.
Quick Reference: Medicine Types & Potencies
| Medicine Type | Potency | Best Use Cases | Spoilage Time |
|---|---|---|---|
| Herbal Medicine | 60% | Minor injuries, basic treatment | 150 days |
| Industrial Medicine | 100% | Diseases, surgeries, serious injuries | N/A |
| Glitterworld Medicine | 160% | Life-threatening surgeries, critical procedures | N/A |
Medicine Types and Medical Potency
Herbal Medicine - The Basic Survival Tool
Herbal Medicine is crafted by harvesting Healroot plants, with each plant yielding one unit. Growing Healroot requires a colonist with a minimum Planting skill of 8 to sow the seeds.
Key Stats: • Healroot: A plant that yields one unit of Herbal Medicine when harvested • Medical Potency: 0.6 (60%) - significantly lower than other medicine types • Spoilage: 150 days (2.5 years) if not stored in refrigerated area
Tend Quality Impact: • Low potency imposes severe penalty on surgery success chance • Makes procedures like bionic installation or organ transplants much riskier • Can lead to prolonged recovery or death from severe diseases like plague
Recommended Usage Strategy: • Set medicine policies to 'Herbal medicine or worse' for minor injuries • Mandate 'Industrial medicine' for diseases, serious injuries, and all surgeries • Conserve industrial supplies by using herbal medicine for cuts and bruises
Industrial Medicine - The Workhorse Standard
Industrial medicine serves as the backbone of colony medical care with reliable performance across all treatment scenarios.
Core Specifications: • Medical Potency: 100% (1.00) - acts as baseline multiplier • Treatment Effectiveness: More potent than Herbal Medicine, less than Glitterworld • Availability: Readily craftable and commonly available from traders
Optimal Applications: • Disease treatment and management • Surgical procedures of all complexity levels • Serious injury treatment • Standard medical care protocols
Strategic Usage: • Reserve for critical medical situations • Use for minor injuries only when herbal medicine is unavailable • Essential for plague and infection treatment • Required for bionic installation surgeries
Glitterworld Medicine - Strategic High-End Resource
Glitterworld Medicine represents the pinnacle of medical technology in RimWorld, offering unmatched treatment capabilities.
Premium Specifications: • Medical Potency: 160% (1.60) - highest available potency • Surgery Success Boost: Significant improvement over standard medicine types • Rarity: Extremely rare, cannot be crafted in standard gameplay
Acquisition Methods: • Exotic goods traders • Special quest rewards • Rare events and encounters
Critical Use Cases: • Life-threatening surgeries or critical injuries • Heart attack treatment • Major bionic implant installation • High-risk organ harvesting procedures • Situations where surgery success rate is crucial
Strategic Reserve: • Save for colony-threatening medical emergencies • Use when standard medicine poses too much risk • Reserve for most valuable colonists • Critical for archotech part installation
Disease Management and Treatment Protocols
The Immunity Race: Core Mechanics
Disease treatment in RimWorld operates on a fundamental competition between infection severity and immunity development. Understanding this mechanic is crucial for colony survival.
Race to 100%: • Death Trigger: Infection reaches 100% first = colonist dies • Recovery Trigger: Immunity reaches 100% first = colonist recovers • Daily Progression: Infection increases ~0.2388 per day without treatment
Treatment Impact: • Slowed Progression: Quality treatment reduces daily infection increase to 0.1715 • Immunity Boost: Treatment quality accelerates immunity development • Net Effect: Gives immunity more time to reach 100% threshold
Key Factors Affecting Outcomes: • Doctor Skill: Higher medicine skill improves tend quality • Medicine Quality: Better medicine provides superior treatment • Hospital Environment: Clean beds and vitals monitors boost effectiveness • Patient Condition: Age, rest, and overall health influence immunity gain
Prevention Strategies: • Sterile Tiles: Reduce infection chances in medical facilities • Penoxycyline: Prevents plague, malaria, and sleeping sickness • Clean Environment: Maintain hospital cleanliness standards • Regular Treatment: Don't wait for symptoms to appear
Plague - The Rapid Killer
Plague represents one of the most dangerous diseases in RimWorld, requiring immediate and aggressive treatment to ensure colonist survival.
Disease Characteristics: • Progression Speed: Rapid advancement requiring swift response • Immunity Gain: 130% base speed (faster than some diseases) • Daily Infection: ~0.28 per day without treatment
Treatment Requirements: • Medicine Quality: Industrial medicine strongly recommended • Doctor Skill: High medicine skill essential for survival • Hospital Facilities: Quality beds and vitals monitors crucial • Consistent Care: Maintain treatment throughout illness
Prevention Protocol: • Penoxycyline: Take every 5 days before symptoms appear • Duration: Protection lasts only while drug is in system • Limitations: Prevents but doesn't cure active infections • Coverage: Also prevents malaria and sleeping sickness
Survival Strategy: • Use industrial medicine exclusively for plague treatment • Ensure hospital beds are excellent quality or better • Position vitals monitors adjacent to patient beds • Monitor immunity levels closely throughout treatment
Infection - The Immediate Threat
Infections represent immediate medical emergencies that can quickly become life-threatening without proper treatment.
Infection Mechanics: • Immunity Gain: 100% base speed • Daily Progression: 0.2388 per day without treatment • Treated Progression: Reduced to 0.1715 per day with quality care
Critical Treatment Factors: • Speed: Immediate treatment essential for survival • Medicine Quality: Industrial medicine dramatically improves outcomes • Wound Care: Keep all wounds clean and sterile • Amputation: Last resort for severe, untreatable infections
Prevention Methods: • Sterile Environment: Use sterile tiles in medical areas • Clean Wounds: Treat injuries immediately • Quality Beds: Hospital beds reduce infection risk • Regular Monitoring: Check colonists for wounds daily
Emergency Protocols: • Treat infections with industrial medicine immediately • Consider amputation if treatment fails • Monitor infection percentage closely • Prepare for potential death if immunity lags
Flu and Gut Worms - Chronic Management
These diseases require sustained treatment and careful monitoring to ensure successful recovery.
Flu Characteristics: • Immunity Gain: 100% base speed • Progression: Standard 0.28 per day infection rate • Prevention: Penoxycyline effective if taken before symptoms
Gut Worms Characteristics: • Immunity Gain: 100% base speed • Progression: Standard infection rate • Prevention: Penoxycyline ineffective - must rely on treatment
Management Strategies: • Consistent Treatment: Maintain medicine supply throughout illness • Hospital Care: Use quality beds and monitors • Patient Comfort: Ensure adequate rest and nutrition • Monitoring: Track immunity vs. infection percentages daily
Surgery Success Factors and Failure Consequences
Maximizing Surgery Success Rate
Surgery success depends on multiple interacting factors that multiply together to determine final outcomes. Understanding and optimizing these elements is crucial for complex medical procedures.
Primary Success Factors:
Doctor Skill Impact: • Medicine skill level directly multiplies treatment quality • Higher skill increases base surgery success chance • Level 14 doctors can achieve 98% success rate cap • Experience directly correlates with surgical outcomes
Medicine Type Multipliers: • Glitterworld Medicine: +30% success bonus • Industrial Medicine: 0.7 multiplier • Herbal Medicine: 0.4 multiplier (severely limiting)
Environmental Factors: • Room Cleanliness: 100% + 5% of room cleanliness (60%-150% range) • Lighting: Directly affects surgeon sight stat • Sterile Tiles: Provide +0.6 cleanliness bonus
Equipment Quality Bonuses: • Hospital Bed Quality:
- Good: +2% surgery success
- Excellent: +4% surgery success
- Masterwork: +6% surgery success
- Legendary: +8% surgery success
• Vitals Monitors: +5% surgery success when adjacent to bed • Strategic Placement: One monitor can serve multiple beds
Doctor Physical Stats: • Manipulation: Essential for precise surgical work • Sight: Critical for accurate procedures • Enhancements: Bionic eyes and hands provide significant improvements
Optimal Conditions Formula: With excellent hospital bed, vitals monitor, clean room with sterile tiles, good lighting, and skilled doctor using industrial medicine, surgery success can exceed 126%.
Special Circumstances: • Inspired Surgery: Guarantees 100% success regardless of other factors • Success Cap: RimWorld imposes 98% maximum success rate • Risk Management: Higher success rates reduce catastrophic failure chances
Understanding Surgical Failure Types
Surgical failures range from minor complications to catastrophic outcomes that can destroy body parts or kill patients.
Minor Complications: • Small cuts and bruises to patient • Superficial injuries requiring basic treatment • Temporary discomfort or reduced mobility
Major Complications: • Significant injuries requiring extended medical care • Surgical wounds prone to infection • Organ damage requiring additional surgery
Catastrophic Failures: • Organ Destruction: Complete loss of body part being operated on • Patient Death: Fatal outcomes from surgical trauma • Component Loss: Destruction of bionic parts during installation • Irreversible Damage: Permanent loss of function or capability
Failure Consequence Management: • Additional medical conditions requiring immediate treatment • Increased risk of infection from surgical wounds • Potential mood penalties for colonists • Resource loss from destroyed components or organs
Organ Harvesting Strategy
Organ harvesting represents a high-risk, high-reward medical procedure with significant ethical and practical implications.
Available Organs: • Heart (highest value) • Lungs (respiratory function) • Kidneys (filtration capability) • Liver (metabolic processing) • Stomach (digestive function)
Success Rate Factors: • Follows standard surgery mechanics • Doctor skill directly affects success probability • Medicine quality crucial for organ preservation • Room cleanliness impacts surgical outcomes • Equipment quality influences success rates
Ethical Considerations: • Colonist Mood: All colonists suffer -6 mood penalty for 6 days • Surgeon Penalty: Separate -6 mood penalty for performing surgeon • Additional Penalties: Per organ harvested mood reductions • Reputation Impact: May affect relationships with other factions
Risk Management: • Optimal Conditions: Use best medicine and facilities available • Skilled Surgeons: Employ highest medicine skill colonists • Backup Plans: Prepare for potential organ destruction • Resource Allocation: Consider cost vs. benefit carefully
Profit Analysis: • Significant profit when sold to traders • Must balance against mood penalties • Consider long-term colonist happiness impact • Evaluate alternative resource generation methods
Prosthetics, Bionics, and Archotech Augmentation
Prosthetics - Functional Restoration
Basic prosthetics provide essential functionality restoration for colonists who have lost limbs or body parts.
Basic Prosthetic Features: • Functionality: Restore lost limb function to normal levels • Stat Bonuses: None - purely restorative • Crafting: Available at fabrication bench after research completion • Acquisition: Also available from traders
Installation Considerations: • Follows standard surgery mechanics • Carries failure risks like any surgical procedure • Failed operations can destroy prosthetic or harm patient • Requires appropriate medicine quality for success
Strategic Applications: • Early solution for limb replacement • Cost-effective alternative to bionics • Suitable for colonists with basic functional needs • Foundation for future enhancement upgrades
Bionics - Enhanced Capabilities
Bionic parts represent a significant upgrade from basic prosthetics, offering permanent stat bonuses and enhanced durability.
Core Bionic Advantages: • Permanent Bonuses: Provide ongoing stat improvements • Disease Immunity: Protection from infections and most injuries • Durability: Cannot be damaged by normal wear • Combat Resistance: Enhanced protection in hostile encounters
Specific Enhancement Values:
Bionic Arms: • Manipulation: 125% improvement • Sight: 125% improvement • Crafting: Requires plasteel, components, advanced components • Research: 'Bionics' research prerequisite
Bionic Legs: • Movement: 130% improvement • Crafting: Standard bionic resources required • Applications: Enhanced mobility and speed
Bionic Eyes: • Sight: 125% improvement • Crafting: Advanced optical components • Benefits: Superior accuracy and awareness
Bionic Spines: • Movement: 100% improvement • Crafting: Complex spinal components • Applications: Core mobility enhancement
Installation Requirements: • Medicine Quality: Industrial or glitterworld medicine recommended • Surgical Environment: Clean, well-lit operating room • Doctor Skill: High medicine skill essential • Success Factors: Follow standard surgical optimization
Trait Interactions: • Transhumanist: Gains mood bonuses from bionic augmentation • Body Purist: Suffers mood penalties from artificial parts • Animal Enhancement: Can also enhance animal capabilities
Archotech - Peak Performance
Archotech parts represent the ultimate in transhumanist enhancement, offering superhuman capabilities that exceed even bionic improvements.
Superior Performance Specifications:
Archotech Arms: • Manipulation: 150% (exceeds bionic 125%) • Sight: 150% (exceeds bionic 125%) • Crafting: Cannot be manufactured in standard gameplay
Archotech Legs: • Movement: 150% (exceeds bionic 130%) • Performance: Peak mobility enhancement • Durability: Virtually indestructible
Acquisition Methods: • Quest Rewards: Special mission completions • Exotic Traders: Rare availability from advanced merchants • Special Events: Unique encounter rewards • Extreme Rarity: Among the most valuable items in game
Installation Requirements: • Medicine Quality: Glitterworld medicine essential • Surgical Environment: Optimal conditions mandatory • Doctor Skill: Highest medicine skill recommended • Success Factors: Perfect surgical conditions required
Durability Features: • Damage Immunity: Immune to diseases, infections, most injuries • Combat Resistance: Superior protection in hostile environments • Longevity: Virtually permanent enhancement • Catastrophic Events: Only destroyed by extreme damage scenarios
Trait Synergies: • Transhumanist: Significant mood bonuses from archotech enhancement • Body Purist: Severe mood penalties from ultimate artificial augmentation • Colony Impact: Transforms colonists into superhuman assets
Medical Facility Optimization
Optimizing Room Environment
Creating the optimal medical environment significantly impacts treatment outcomes and surgical success rates.
Sterile Tile Implementation: • Cleanliness Bonus: +0.6 per sterile tile • Surgery Impact: Directly multiplies success rates • Infection Prevention: Reduces wound infection chances • Coverage: Use throughout medical facility
Room Cleanliness Calculations: • Formula: 100% + 5% of room cleanliness • Range: 60% minimum to 150% maximum • Maintenance: Regular cleaning required • Contamination: Keep away from high-traffic areas
Lighting Optimization: • Surgical Impact: Directly affects surgeon sight stat • Operating Room: Ensure bright, even lighting • Shadow Avoidance: Eliminate dark areas in medical zones • Night Operations: Provide adequate artificial lighting
Environmental Management: • Location: Position away from dusty or dirty areas • Traffic Control: Minimize non-medical personnel access • Air Quality: Ensure good ventilation • Noise Reduction: Maintain quiet environment for patient rest
Essential Medical Equipment
Proper medical equipment selection and placement dramatically improves treatment outcomes and surgical success rates.
Vitals Monitor Specifications: • Surgery Bonus: +5% success chance when adjacent to hospital bed • Coverage: One monitor can serve multiple beds strategically • Placement: Position for maximum bed coverage • Investment: High priority for surgical facilities
Hospital Bed Quality Levels:
Good Quality Beds: • Surgery Success: +2% bonus • Comfort: Basic patient comfort • Crafting: Standard hospital bed construction
Excellent Quality Beds: • Surgery Success: +4% bonus • Comfort: Enhanced patient rest • Crafting: Requires higher construction skill
Masterwork Quality Beds: • Surgery Success: +6% bonus • Comfort: Superior patient experience • Crafting: Requires masterwork construction
Legendary Quality Beds: • Surgery Success: +8% bonus • Comfort: Ultimate patient comfort • Crafting: Legendary construction skill required
Equipment Placement Strategy: • Adjacency: Ensure vitals monitors touch hospital beds • Coverage: Maximize monitor reach to multiple beds • Quality Stacking: Combine high-quality beds with monitors • Room Design: Optimize layout for equipment efficiency
Maximizing Surgery Success
Achieving maximum surgery success requires combining all optimization factors for exceptional medical outcomes.
Success Rate Optimization Formula: • Base Success: Doctor skill level • Medicine Multiplier: Medicine type potency • Environment Bonus: Room cleanliness factor • Equipment Bonus: Bed quality + vitals monitor • Lighting Bonus: Adequate illumination
Optimal Configuration: • Doctor: Level 14+ medicine skill • Medicine: Industrial or glitterworld quality • Room: Sterile tiles throughout • Bed: Legendary quality hospital bed • Monitor: Vitals monitor adjacent to bed • Lighting: Bright, even illumination • Cleanliness: Maximum room cleanliness
Expected Outcomes: • Success Rate: Can exceed 126% with optimal conditions • Risk Reduction: Minimal chance of catastrophic failure • Patient Safety: Highest level of surgical protection • Resource Efficiency: Reduced need for repeat procedures
Special Considerations: • Inspired Surgery: Guarantees success regardless of other factors • Success Cap: 98% maximum success rate in base game • Risk Management: Higher success rates reduce complications • Resource Investment: Significant upfront cost for optimal setup
Conclusion
Effective medical management in RimWorld evolves through distinct phases, from basic survival necessity to strategic enhancement through advanced augmentation. The foundation lies in understanding the critical immunity race mechanic, where treatment quality determines whether colonists survive deadly diseases like plague and infections.
Mastering medicine selection—from herbal medicine for minor injuries to glitterworld medicine for life-threatening procedures—forms the basis of effective medical care. Disease treatment protocols require consistent application of quality medicine, optimal hospital environments, and skilled medical personnel to ensure immunity development outpaces infection progression.
Surgical optimization encompasses multiple factors including doctor skill, medicine quality, room cleanliness, and equipment excellence. Advanced medical facilities with sterile tiles, vitals monitors, and quality hospital beds create optimal conditions for complex procedures ranging from organ harvesting to bionic implantation.
The progression from basic prosthetics through bionic to archotech augmentation represents the pinnacle of colony medical advancement. This transformation converts colonists into superhuman assets capable of overcoming RimWorld's harsh survival challenges while establishing the colony as a beacon of medical excellence in the rimworld frontier.
More RimWorld Guides
RimWorld Pawn Mastery: Complete Colony Control Guide
Master RimWorld pawn management with our comprehensive guide covering colony scaling, automation, and the critical 14-colonist threshold.

The Ultimate RimWorld Colony Blueprint: Mastering Room Sizes, Layout Efficiency, and Defensive Architecture
Complete guide to RimWorld base building covering optimal room dimensions, defensive killbox design, temperature management, and strategic material selection for colony survival.

The RimWorld Material Mastery Guide: From Basic Components to Advanced Fabrication
Complete guide to RimWorld resource management covering components, advanced components, neutroamine, plasteel, steel, and cloth. Learn crafting strategies and acquisition methods for colony survival.
AI Tactical Companion
Consult with our specialized tactical engine for RimWorld to master the meta instantly.