Mastering ACNH Flower Genetics: The Ultimate Breeding Guide
Ever stared at your Animal Crossing flower beds, wondering why the colors won't cooperate? The secret is a hidden genetic system that governs every bloom. This guide breaks down the complex DNA of ACNH flowers, from the three-gene alleles to the visitor watering bonus, giving you the precise knowledge to finally breed those elusive blue roses and green mums.
Understanding ACNH Flower Genetics: The Hidden DNA System
If you've ever wondered why your red roses won't spit out blue ones no matter how much you pray to Isabelle, here's the truth: every flower in ACNH runs on a hidden DNA system that doesn't care about your hopes and dreams. It cares about alleles.
The Three-Gene System: R/Y/W Alleles Explained
Every single flower carries a three-gene string made up of R, Y, and W slots. These aren't just cosmetic labels - they're actual switches that determine everything.
The R and Y genes are simple on/off switches for pigment: either they're active (1) or they're not (0). The W gene is trickier because it's a brightness dial with three possible settings (0, 1, or 2), which basically controls how washed-out or vibrant your flower looks.
Now, roses are the divas of this system because they get a fourth gene - the S gene - that nobody else has. This is why breeding blue roses is such a nightmare. A 'hybrid-red' rose isn't just any red rose; it needs very specific alleles in that S slot to even have a chance at making blue offspring. You can't tell by looking at it, which is the whole problem.
That brings us to the big takeaway: there are 18 possible genotype combos from these three slots (3 x 2 x 3), and most of them map to the same handful of colors you see in-game. Two flowers might both look yellow, but one could be genetically useless for your breeding project while the other is a goldmine.
Breeding Mechanics: Cloning vs Cross-Pollination
The game runs a breeding check at 5 AM every single day. This isn't a suggestion - it's a hardcoded appointment. Each flower gets one roll, and if the conditions are right, it'll pop out a baby in any empty tile in its 3x3 neighborhood.
Here's where it splits into two paths:
Cloning happens when your flower has an open tile nearby but no compatible partner. No other flower of the same species in those eight surrounding spaces? Congratulations, it'll clone itself. The offspring is a perfect genetic copy of the parent, which is exactly what you want when you've landed that perfect hybrid and need duplicates.
Cross-pollination kicks in when there's at least one viable partner in that 3x3 grid. The game picks a random neighbor, mixes their genes through a Punnett square-style calculation, and produces something new. This is how you get rare colors - but also how you accidentally ruin purebred lines.
One critical detail: cliffs, rivers, and hard paths count as invalid tiles. If you've got a flower surrounded by seven dirt tiles and one cliff edge, that cliff breaks the grid. The game won't spawn offspring there, which can seriously mess with your layout efficiency.
Visitor Watering Bonus: The 80% Spawn Rate Secret
This is where you go from amateur gardener to flower tycoon. A flower you never watered has a measly 5% spawn chance. That's terrible. But if you water it yourself, that chance climbs by 5% each day, maxing out at 90% after 20 days. Still not amazing.
Now here's the magic: each unique visitor who waters your flowers adds a flat 15% bonus, stacking up to five visitors. The math is brutal in your favor - five visitors equals a 75% bonus, pushing your spawn rate to roughly 80% total. That's not a typo; you're going from a 1-in-20 chance to a 4-in-5 chance.
You can tell it's working because the flowers will have gold sparkles instead of the usual silver ones. After five visitors, you get 'super sparkles' - bigger, flashier, impossible to miss. That's your visual confirmation the bonus is maxed.
Just don't sabotage yourself. If you dig up a flower after visitors have watered it, you reset that bonus counter to zero immediately. The sparkles vanish, the percentage drops, and you'll need those five visitors all over again. Plant your garden, call your friends, water once, and leave it alone.
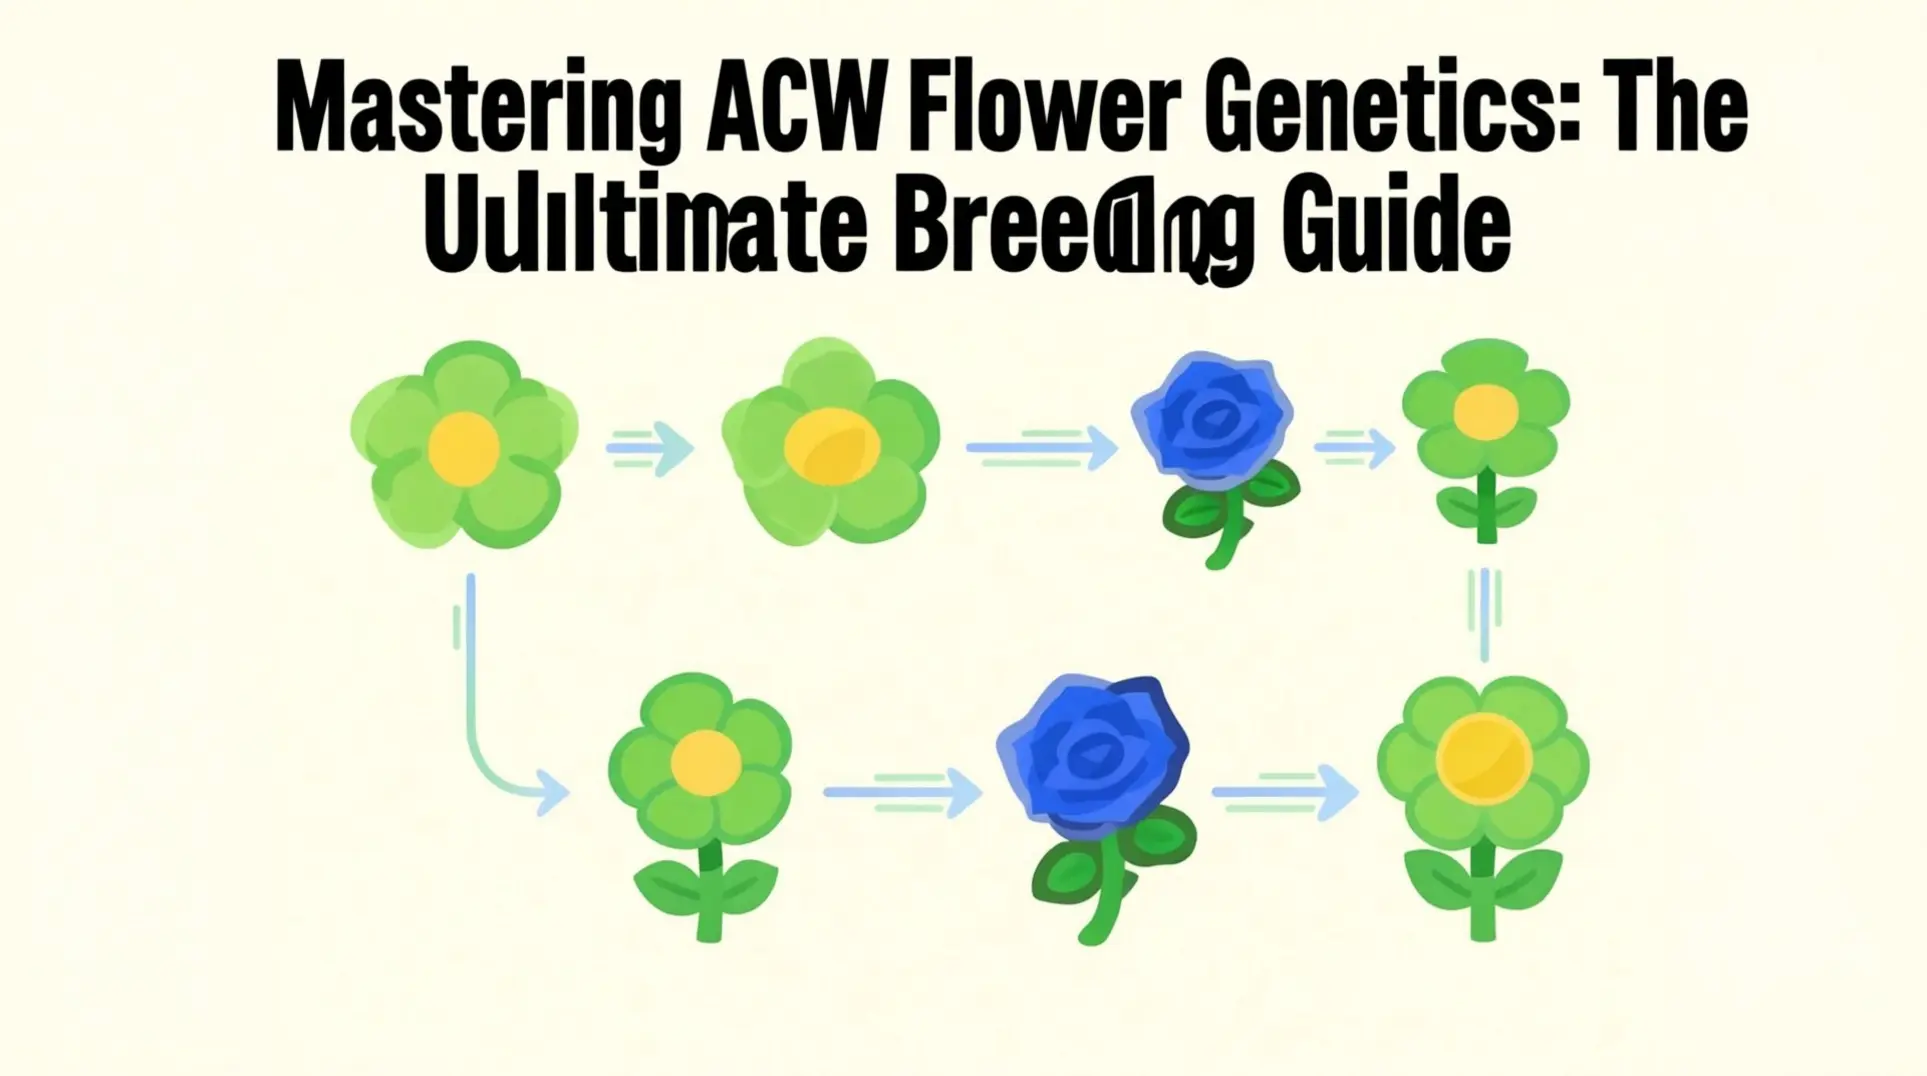
The Blue Rose Challenge: 6-Step Genetic Pyramid
Here's the brutal truth about blue roses in Animal Crossing: they're not just rare - they're a six-step genetics puzzle that'll test your patience. But if you're ready to commit, this pyramid method is the most reliable path we've got.
Step 1-2: Creating Special Purple Roses
First things first: you can't just grab any white roses. You need to buy seed-bag white roses from Nook's Cranny, because native island whites have messy genetics that'll break the whole chain. Cross two seed whites together and you'll get purple roses at about a 25 percent chance per bud. These aren't your garden-variety purples - they carry the crucial W allele that you'll need for the final steps, so treat them like gold.
Step 3-4: Breeding Hybrid Oranges and Special Reds
Now the real work begins. Take your special purple and cross it with a seed yellow to produce a special yellow rose, then breed two of those special yellows together and they'll make a special white that still retains that precious W allele. Here's where the grind gets painful: crossing special white with special purple only gives you a special orange at a 6.25 percent spawn rate, which means you'll be waiting days, maybe weeks, for the right one. This orange is non-negotiable - it's the only rose that can produce the final red you need.
Step 5-6: The Final Cross to Blue
You're almost there, but the worst is yet to come. Breed your special orange with another special purple and you've got a 6.25 percent chance to spawn a special red rose. Not every red will work, though - you absolutely must test them by cloning each candidate in isolation. If every single clone is red, you've hit the genetic jackpot. Once you have two verified special reds, breeding them together yields blue roses at a 25 percent rate. The payoff? Each blue rose sells for 1,000 Bells, the highest price of any flower in the game. Good luck - you're going to need it.
Green Mums: The Two-Step Genetic Shortcut
Getting green mums isn't as simple as throwing random yellows together. The game tracks flower genes under the hood, and green mums need a very specific combo: the rrYY genotype. That means two recessive red alleles and two dominant yellow ones, which most store-bought flowers just won't give you.
Your first move is creating the right hybrid yellow mums. Take a seed yellow mum and breed it with a seed red mum - this cross will give you a hybrid yellow 100% of the time. These aren't your ordinary yellows; they secretly carry that crucial recessive red gene (rr) you'll need later.
Once you have those hybrid yellows, breed them together. This is where things get interesting: two hybrid yellows have a 25% chance of producing special purple mums (rryy). But - and this is critical - don't use seed purple mums. They might look the same, but they lack the rr gene, so they're dead ends for your green mum project.
Now for the final step. Breed two of those special purple mums together, and you'll have a 6.25% chance of getting a green mum (rrYY). Yeah, it's a grind. The odds are low, which means you'll want to set up a dedicated breeding patch with multiple pairs of your special purples to speed things up.
Optimal Breeding Layouts: Checkerboard vs Diagonal Strategies
Checkerboard Layout: Mass Production Phase
If you're trying to pump out hybrids in bulk, the checkerboard layout is your best friend - especially during the early stages when you're after common crosses. You plant in an X-O-X pattern, which leaves a one-tile gap between every two flowers, and this setup is brilliant because it forces each parent to only touch one neighbor. That single-neighbor rule maximizes empty tiles for hybrids to spawn while completely shutting down self-cloning.
Here's what the grid should look like:
Row 1: X x X x X Row 2: x X x X x Row 3: X x X x X Row 4: x X x X x (Uppercase X = flower, lowercase x = empty ground)
The downside is space, since you need to keep any other flowers at least two tiles away or their pollen will contaminate your grid. So yeah, this method eats up real estate, but the yield is absolutely worth it when you're stockpiling.
Diagonal/X Pattern: Genetic Purity Phase
Once you're chasing the rare stuff like Blue Roses or Green Mums, checkerboard isn't precise enough - you need the diagonal layout. By placing flowers on alternating diagonal positions, you guarantee each one has exactly one partner, which prevents self-cloning and forces true cross-pollination every single day. This is non-negotiable for the final breeding steps.
The classic X template looks like this:
A . A . A . B . B . A . A . A . B . B . (A and B = parent flowers, . = empty tile)
Here's why this matters: when you pair Special Red roses (genotype RRyyWW) diagonally, they have a clean 25% daily spawn chance for Blue Roses. Same deal with hybrid yellow mums (genotype YY) - diagonal pairing gives you that same 25% shot at Green Mums. Without this layout, you're gambling with bad odds.
Isolated Pairs: Precise Genetic Control
Sometimes you need total control over the gene pool, and that's where isolated pairs come in. You plant just two parents with empty tiles all around them, which ensures they can only cross-pollinate with each other. This lets you track exact genetics and confirm you're working with the right parents.
This method is critical when you're testing Special Reds for the Blue Rose process - you need to verify they're RRyyWW before committing to phase 7. You can also clone a single Special Red by planting it alone; the copy will be genetically identical, so you can mass-produce your parent stock.
Just remember the spawn mechanics: each parent only produces one baby or clone per day. If you want to speed things up, get up to five friends to water - external watering bumps the daily spawn rate to 80%, but it won't change the underlying genetics.
Other Rare Hybrids: Complete Breeding Charts
Intermediate Hybrids: Purple Windflowers & Black Cosmos
Not every hybrid is a one-and-done deal. Purple Windflowers take three full steps: you start with Red and White seed bags to breed Pink Windflowers, then you breed those Pink Windflowers together to get Purple, which means you'll be checking those patches for days.
Black Cosmos are just as demanding since you'll need Orange Cosmos first, then you must plant them using the 'clone pair' method - two Orange Cosmos with one empty space between them. This setup only gives you a 25% spawn chance, so you'll be waiting a while.
| Hybrid | Parent 1 | Parent 2 | Method/Chance | Notes |
|---|---|---|---|---|
| Purple Windflowers | Pink Windflowers | Pink Windflowers | Standard breeding | 3-step process: Red×White → Pink first |
| Black Cosmos | Orange Cosmos | Orange Cosmos | Clone pair (one space between) | 25% spawn chance |
Simple Hybrids: Pink, Orange & Black Varieties
Before you tackle the intermediate stuff, you'll want to lock down the basics. Pink flowers come from Red × White in a checkerboard layout for Roses, Tulips, and Cosmos. Orange hybrids pop up when you pair Red × Yellow for Cosmos, Lilies, Pansies, and Tulips.
Black flowers mostly follow Red × Red - this works for Tulips, Lilies, and Cosmos. Black Roses are the exception: they need bred-red parents (not seed-bag reds) and have a miserable ~1.6% spawn chance.
| Hybrid | Species | Parent 1 | Parent 2 | Layout | Notes |
|---|---|---|---|---|---|
| Pink | Roses, Tulips, Cosmos | Red | White | Checkerboard | Simple one-step |
| Orange | Cosmos, Lilies, Pansies, Tulips | Red | Yellow | Checkerboard | Simple one-step |
| Black | Tulips, Lilies, Cosmos | Red | Red | Checkerboard | Simple one-step |
| Black Roses | Roses | Red (bred) | Red (bred) | Checkerboard | ~1.6% chance |
Special Cases: Gold Roses & Lily of the Valley
Here's where things get fancy. Gold Roses require the Golden Watering Can recipe, which you'll only get after hitting a 5-star island rating. Once you've got the can, you must water a Black Rose with it to spawn Gold Roses.
Lily of the Valley also demands that 5-star rating, but it's much easier - you can't breed them at all. They spawn automatically, one per week, on cliff edges. You can't breed them, so just let them appear and enjoy the flex.
Gold Roses: Get Golden Watering Can at 5-star rating → water Black Roses → spawn Gold Roses
Lily of the Valley: Achieve 5-star rating → spawns automatically on cliff edges (one per week) → cannot breed
Switch 2 Edition Optimizations & Advanced Tips
Hardware Advantages: Faster Breeding Cycles
If you've ever tried cloning a hundred roses on the original Switch, you know the pain - inventory lag that makes sorting stems feel like swimming through honey. That’s gone on Switch 2. The extra RAM and faster SSD cut inventory stutter so dramatically that mass cloning runs about 15% faster, which means you can cycle through watering, digging, and replanting without wanting to throw your controller.
The improvements don't stop there. Fast-travel and building entry load times drop by roughly 25-30%, so bouncing between your backyard breeding zone and Nook’s Cranny for seed bags feels nearly instant. Even better, crowded flower fields no longer tank your framerate - you get a locked 30 fps even when you're staring down a 20x20 hybrid grid. That stability makes it way easier to spot the daily sparkle animation, so you won't waste time re-watering plants that are already done.
For layout planning, the photo mode grid overlay is your best friend. You can snap reference shots of your garden's exact tile positions, which makes rebuilding those precise checkerboard patterns after a redesign way less of a headache.
Genetic Tracking Methods: Spreadsheets & Labeling
Here’s the thing: flower colors in ACNH lie to you. Two red roses might look identical, but one could carry the right genes for a Blue Rose while the other is genetic dead weight. The only way to know for sure is tracking hidden genes (R, Y, W, S) on a spreadsheet, because Mendelian inheritance doesn't care about your feelings.
The community pinned down a solution years ago - Aeter's Google Sheet - and it's still the gold standard. It comes with genotype lookup tables, a five-stage Blue Rose path that tells you exactly which parents to plant in which spots, and a cloning tracker so you don't lose count of your 'good' hybrids. If you're serious about breeding, you’ll live in this spreadsheet.
Before you even start, lock in one rule: only breed from seed-bought flowers. Their genetics are fixed and clean, which means every hybrid chain you build has a solid foundation. Wild or mystery island flowers are contaminated until proven otherwise.
When your garden gets crowded, use custom design patterns on the ground as labels. Mark off Stage 1 reds, your verified orange hybrids, or any plant you’ve test-bred. It’s low-tech, but it beats accidentally digging up the wrong rose and nuking two weeks of progress.
Troubleshooting Common Breeding Issues
So your hybrids are spawning the wrong color - what gives? Most of the time, you've got two flowers that look the same but carry different genes. The fix is brutal but simple: start over from seed bags. Don’t try to salvage contaminated lines; you’ll just waste more days.
If nothing spawns at all, you’re likely looking at a layout problem. Flowers need a checkerboard pattern with empty tiles between them, and they won’t breed if they’re placed diagonally without a buffer. Watering matters too - your own can gives a base chance, but each unique visitor (up to five) stacks multiplicatively. If you’re not hitting five friends, you’re missing out.
Genetic contamination is the silent killer. Maybe you cloned what looked like a perfect pink cosmo, but it drops orange babies the next day - that’s a fake hybrid. The solution? Test-cross any unknown flower with a seed-grown partner before you let it near your main breeding pool. If the offspring color doesn't match the expected genotype, trash the parent and move on. It's harsh, but it's the only way to guarantee your Blue Rose project doesn't die on stage four.
Fast-Track Timeline & Expected Results
If you're wondering how long this actually takes, the answer depends entirely on how much help you're willing to accept. The difference between solo grinding and coordinated visitor watering is night and day, and it's the single biggest factor in whether you're done in two weeks or three months.
Blue Rose: 12-16 Days with Visitor Bonus
That 12-16 day promise you see everywhere isn't a lie, but it's got some heavy caveats. You'll need a 5x5 grid, a golden watering can, and most importantly, 5+ visitor bonuses all hitting your flowers daily - that multiplier jacks up your spawn chance to 2.6x, which means you're actually rolling the 1/64 genetic lottery fast enough to finish in two weeks. Speed-runners cheat this even harder by time-traveling to brute-force the rolls, but if you're playing clean, this is your baseline.
Without those visitor bonuses, you're looking at a much rougher ride. Organic play stretches to 6-8 weeks with some help, and unlucky solo players have reported waiting 100+ days for that first blue. The genetics are brutal, and the game doesn't care about your patience.
Once that first blue finally spawns, you should immediately stop breeding and start cloning. Place it on a checkerboard pattern away from other roses, and it'll duplicate itself every day with visitor help - no more randomness, just guaranteed copies.
Green Mum: 4-6 Days with Optimal Layout
Green mums are the complete opposite - they're the blue rose's chill cousin. If you set up a diamond layout with purple mums, you'll see a green mum bud on Day 1, and you can pick the flower by Day 4. Total time: 4-6 days if you're watering daily.
The layout matters more than luck here. A 3x3 sub-grid of purple mums on dark-soil tiles gives each flower an independent 70% spawn roll, and keeping weeds cleared within two tiles ensures you don't block potential spawns. Visitor bonuses still help - they push that 70% chance up to 80% and shave another day off your wait - but you can realistically get your first green mum in under a week without any help.
Mass Production: Cloning vs Breeding Efficiency
This is where you pivot from 'I just want one' to 'I need 50 for my garden.' Cloning a rare hybrid in a checkerboard pattern with visitor watering produces roughly 1.3 clones per flower per day at an 85% success rate, and each clone is an exact genetic duplicate - zero surprises. Breeding, by contrast, is only useful for hybrids you don't own yet.
The strategy is simple: breed until you get one specimen, then retire that plot and convert it to a clone farm. To force clones, make sure no two flowers of the same species touch - even diagonally. Use custom-design dirt tiles to space them perfectly and prevent accidental cross-breeding. For decoration goals, cloning is pure efficiency. For completion, you only need to suffer through breeding once.
Mastering flower genetics transforms gardening from a guessing game into a precise science. By understanding the hidden DNA, optimizing your layouts, and leveraging visitor bonuses, you can systematically breed any hybrid. Now, armed with this knowledge, you're ready to cultivate the perfect island paradise.
More animal-crossing-new-horizons-switch-2-edition Guides
The Ultimate Animal Crossing Villager Tier Guide - Rankings, Trading & Switch 2 Meta
A complete guide to Animal Crossing villager popularity, from S+ elite residents to underrated gems. Learn trading strategies, tier rankings, and how the Switch 2 Edition is reshaping the meta.
Ultimate Animal Crossing: New Horizons 2026 Island Design Guide
Discover advanced techniques, trending themes, and essential resources for creating your dream island in Animal Crossing: New Horizons with the Switch 2 Edition and 3.0 update.

Ultimate Animal Crossing: New Horizons Switch 2 Island Design Guide
Learn how to design your perfect island in Animal Crossing: New Horizons Switch 2 Edition. Master layout fundamentals, villager housing, path design, terraforming, and achieve 5-star ratings.
AI Tactical Companion
Consult with our specialized tactical engine for animal-crossing-new-horizons-switch-2-edition to master the meta instantly.