BallXPit Base Building Guide: Optimized Layouts, Resource Loops & Progression
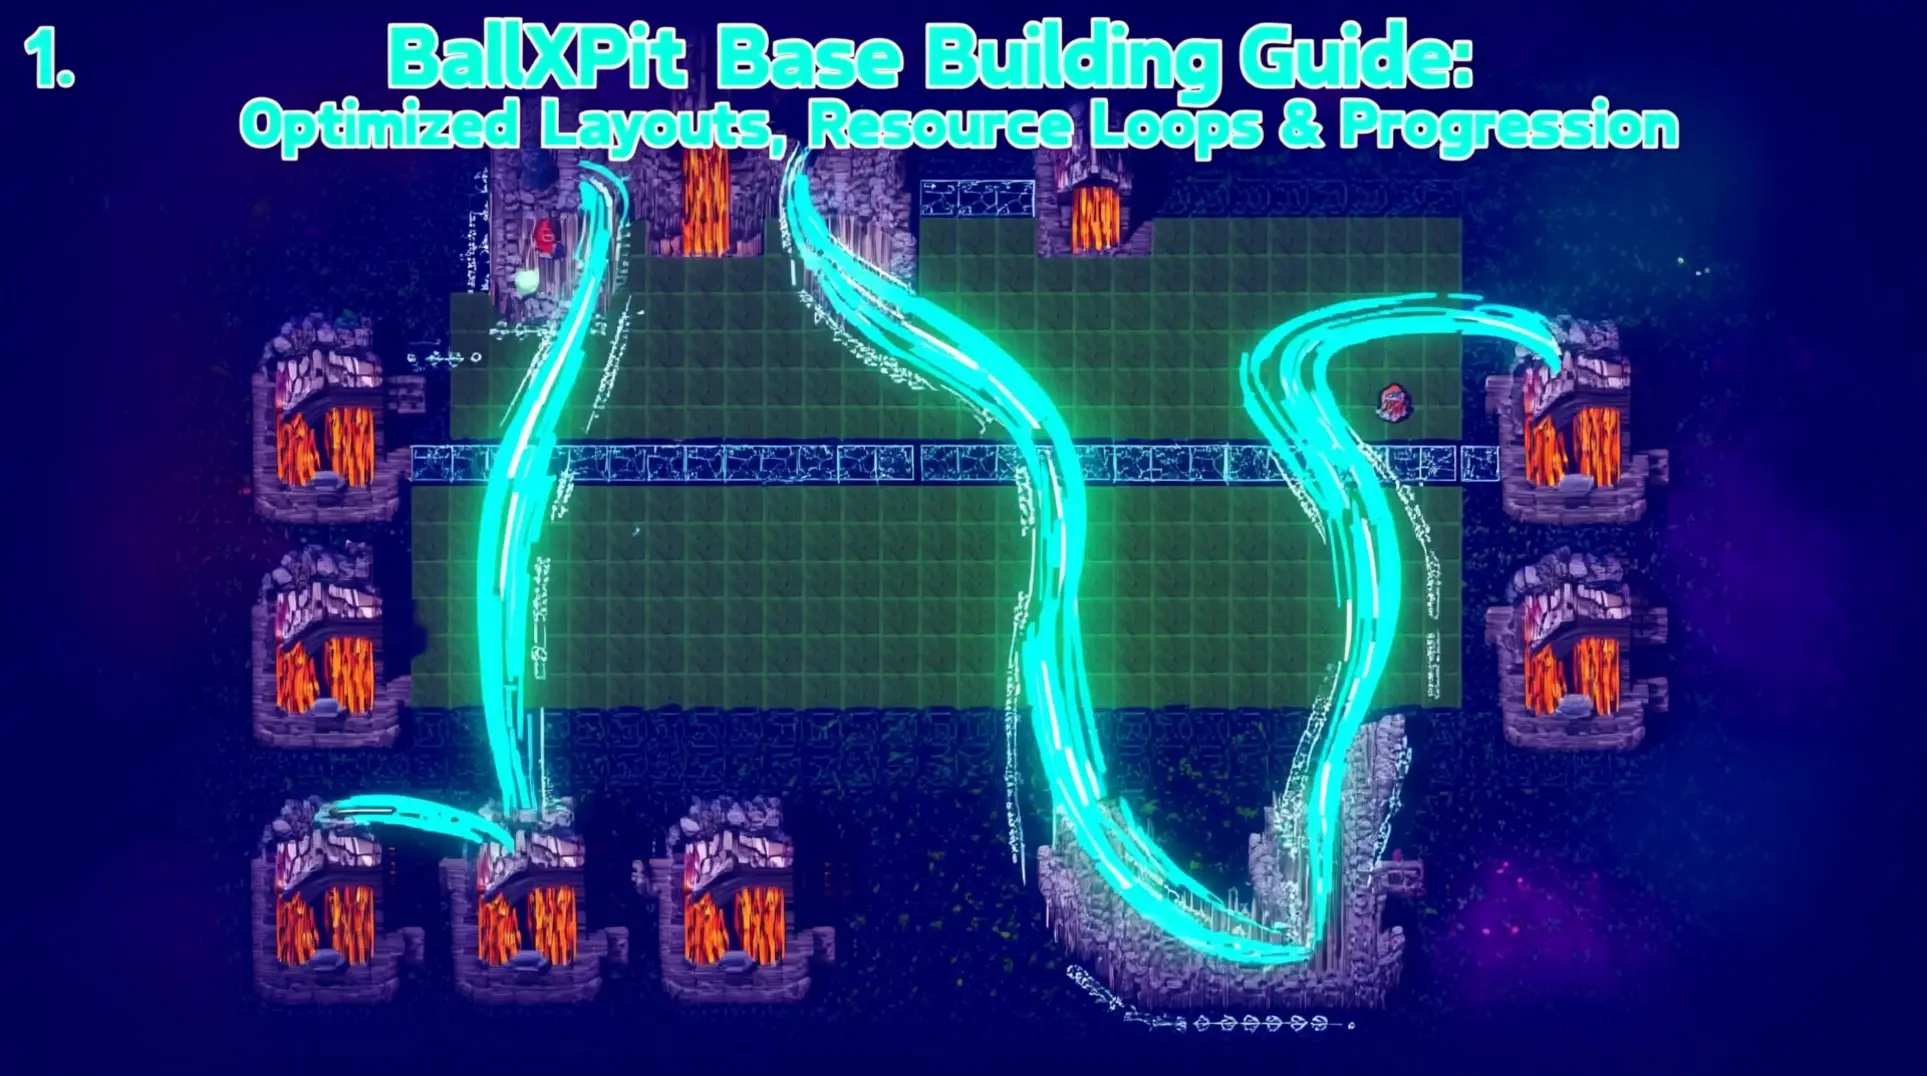
Building an efficient base in BallXPit isn't about random placement - it's a precise science of maximizing bounces and synergies. From the foundational U-shaped gold farm to the late-game Iron Fortress funnel, every tile and upgrade path matters. This guide breaks down the exact layouts, build orders, and resource loops you need to transform your base from a messy backyard into a gold-printing, self-sustaining machine.
Core Building Categories & Strategic Priorities
Production Buildings (4 Types): Gold, Wheat, Wood, Stone
You've got four basic resource generators, but let's be real - Gold Mines are the entire economy once you hit mid-game. The other three are just stepping stones. The real magic happens when you arrange seven of these bad boys in a tight U-shape, which cranks out 2,500-3,100 gold per harvest at peak efficiency. This isn't just about cramming buildings together; the compact shape forces the ball to rebound like crazy, so it passes over each mine multiple times before escaping.
Here's the kicker: you won't even get Gold Mine blueprints until you're grinding pit runs, so prioritize grabbing those the moment they appear. Once you've got your U-shape running, you'll want Veteran's Huts and Watchtowers hugging that formation tight - their buffs turn a good harvest into a great one.
Character Unlock Buildings (16 Total): Strategic Roster Expansion
Sixteen character houses sounds overwhelming, but you don't need them all at once. Your first targets should be the S-tier trio: The Pitling, Shieldbearer, and Physicist. The Pitling is absurd for XP farming, Shieldbearer turns your defense into an unbreakable wall, and Physicist makes the ball physics work for you instead of against you.
Now, here's where most players get confused: blueprints aren't random drops. They unlock when you hit specific milestones - like finishing a certain number of runs or beating particular bosses. The Pitling's blueprint pops after you get early fusion access, so you'll want to rush that. Shieldbearer needs you to build some prerequisite structures first, which means you've got to plan your base around unlocking him, not just slapping down random houses.
Stat Buildings (6 Types): Permanent Power Scaling
Six stat types exist - Intelligence, Strength, Endurance, Leadership, Dexterity, and Speed - and they all rank up from D to S. But here's the deal: Intelligence is your god stat for endgame. It unlocks damage formulas and stacking mechanics like radiation and frostburn that you'll absolutely need to push past Wave 20. Strength is fine for special ball damage early on, but it falls off hard compared to Intelligence breakpoints.
Reaching S-rank in any stat means stacking multiple upgraded buildings, which gets expensive fast. For Intelligence, you'll want to aim for specific breakpoints - 13 or 18 are the sweet spots where the scaling really kicks in. Don't spread yourself thin; pick one stat and commit.
Upgrade Buildings (4 Game-Changers): Advanced Mechanics Unlock
These four buildings will fundamentally change how you play. Matchmaker is your first major goal - it unlocks two-character runs and upgrades your secondary's starting ball level, which opens up combo strategies you can't even imagine in single-character mode. Build this the second you can afford it.
Bag Maker is simpler but just as crucial: each upgrade gives you another ball slot, and more balls means more chaos (the good kind). Antique Shop lets you pick a passive ability at the start of every run, which gets stronger as you upgrade the shop. Then there's Evolution Chamber - this is pure late-game content for permanent power spikes through character evolutions, but you'll need rare materials from deep runs to make it work.
Buff Buildings (2 Types): Area-Effect Optimization
You've got Veteran's Hut for XP and Captain's Quarters for stats, and placement is everything. Veteran's Hut radiates its buff in a 2-3 tile radius, so slam that thing dead center of your housing cluster. Captain's Quarters only boosts warfare buildings, which means it needs to sit right next to your military structures to be worth the tile space.
The optimal setup looks like this: Veteran's Hut surrounded by character houses, Captain's Quarters adjacent to your combat buildings, and resource generators positioned for clean harvesting lines. Upgrading these buff buildings first is actually smart - it often increases their range or effect strength, which pays dividends across your entire base.
Special/Utility Buildings (2 Types): Late-Game Quality of Life
Markets and Offline Farms won't win you any runs directly, but they'll save you hours of grinding. Markets let you convert stockpiled wheat, wood, and stone into gold, which becomes massive once you've got resources piling up from offline generation. Build these near your resource clusters so you can dump materials efficiently.
Speaking of offline, your farms, lumberyards, and quarries keep producing at 30% speed while the game is closed, capping at maximum capacity. The best ratio is 3 farms, 3 lumberyards, and the rest in quarries - this balances your passive income so you're not starving for any single material when you log back in. Think of it as a 60/40 split between pure resource structures and utility buildings; that's the sweet spot for a self-sustaining economy.
Advanced Layout Optimization: Beyond Basic U-Shaped Designs
Once you've got the basics down, it's time to stop fumbling around and start building like you actually know what you're doing. These setups aren't just about looking organized - they're about squeezing every last drop of efficiency out of your characters and their bounces.
The 7-Mine U-Shaped Gold Farm: 2,500-3,100 Gold Per Harvest
This is the gold standard (pun absolutely intended) that'll change your economy forever. You're building a tight U-shape with three mines on the left, three on the right, and one at the top to close it off. The magic happens because characters bounce between mines like pinballs instead of wandering off to admire the scenery.
Here's how it looks:
[GM7]
[GM1][GM2][GM3] | | | [GM4][GM5][GM6]
GM = Gold Mine. Position your fastest, bounciest characters at the bottom entrance, and they'll chain-react through all seven mines in one smooth motion. The tight clustering means they barely travel between hits, so you're getting 2,500-3,100+ gold per harvest instead of the usual 800-1,200.
The trick is timing your harvests when your base isn't under siege - because nothing kills your gold run like a random enemy wave scattering your farmers. If you've got movement speed or bounce boost items, pop those right before you launch your characters. The difference is night and day.
Corner Cluster Layout: Resource Concentration Strategy
Not everything is about gold. Sometimes you need wheat, wood, and stone flowing in simultaneously, and that's where corner clusters slap. You're cramming Farms, Lumberyards, and Stone Mines into an L-shape or tight U-shape jammed into a map corner.
Why corners? The wall bounces create automatic loops. Characters rebound 5-10 times per shot into wheat fields, and wood collection jumps up 30-40% because they're hitting multiple lumberyards before gravity takes over. It's like the walls are working for you.
The real flex here is flexibility. You don't have to tear down buildings when your needs shift - just reassign workers. If you're suddenly stone-hungry, swap out 1 Farm and 2 Lumberyards for 3 Stone Mines while keeping the same layout. The bounce paths stay identical, but your yields pivot instantly. That's how you adapt without rebuilding.
Fast Construction Corridor Method: 2-3x Build Speed
Waiting 2-5 minutes for a Gold Mine to finish is for people who don't know about corridors. This technique is stupidly simple but brutally effective: build a 1-tile-wide straight path leading directly to your scaffolding.
Characters get funneled into a single-file line, and every bounce smacks the construction site in rapid succession. Instead of random wandering, they're hitting the target like a metronome. What used to take five minutes now finishes in under two.
How to set it up:
- Clear a straight line exactly one tile wide from your launch point to the scaffolding
- Use temporary walls to keep characters from escaping sideways
- Launch them into the corridor entrance and watch the build timer melt
For big projects, chain multiple corridors together. You can have three buildings going up at once, each with its own dedicated pinball lane. If characters aren't bouncing enough, just tighten the walls - they're not claustrophobic, and you're not paying them by the hour.
Min-Maxing Building Placement: Buff Coverage & Synergy
Here's where you stop playing and start optimizing. The Veteran's Hut isn't just another building - it's the beating heart of your entire operation. Its buff radius is limited, so you plant that thing dead center or you're throwing away a 50% efficiency boost on everything around it.
Your priority order is simple: Upgrade the Veteran's Hut first to expand its range, then spam gold mines within that radius. Cluster two rows of three Gold Mines right near your entrance where the buff hits hardest. That's your economic engine.
Character buildings like the Theater and Single Family Home need to snuggle up next to the Veteran's Hut too, but there's a catch - they also need to touch their resource tiles for 90-100% collection coverage. It's a juggling act, but when you nail it, your whole base starts humming in a feedback loop of pure efficiency. Miss the central placement and you're basically running at half power for the entire run.
The Iron Fortress Funnel: Advanced Gold Generation
This is the endgame setup that makes the 7-mine U-shape look like child's play. The Iron Fortress passively buffs nearby structures, and when you arrange your seven gold mines in a U-shape around it, you create a cascade effect that breaks the economy wide open.
Characters get funneled toward the fortress during harvests, collecting from multiple mines in a single pass while the fortress's efficiency boost stacks. You're not just getting 2,500-3,100 gold anymore - you're getting that amount faster, with less idle time and optimized movement.
The progression timeline looks like this: Rush the Iron Fortress, position it centrally, wrap your U-shape gold mines around it, then launch your fastest characters into the funnel. The result is a gold generation machine that'll have you unlocking endgame upgrades before you even finish Act 2. Once you try this, there's no going back to basic farming.
Resource Management & AFK Farming Optimization
16-Character Cap Optimization: Strategic Deployment
The 16-character cap isn't just a number - it's the moment your base stops being a messy backyard and starts printing resources. Once you hit this threshold, everything changes, which means you need to think strategically about where each character goes.
The gold standard (literally) is the 7-mine U-shaped layout, and it cranks out roughly 2,500 gold per harvest when optimized. This layout works because it maximizes how many hits your characters can land in a single pass, so you're not wasting time running around.
If you're planning to go offline for a while, you'll want a different setup: 12 stone quarries, 2 wood forests, and 2 wheat fields. This keeps your characters busy with minimal supervision, but it's pretty one-dimensional and lacks flexibility.
For a more balanced approach, try 7 wood forests, 7 wheat fields, and 4 stone quarries. This setup handles various building upgrades without constant reconfiguration, which saves headaches in the long run.
Don't forget building placement - Veteran's Hut and Captain's Quarter need to be positioned so every house gets the experience bonus and all your stat buildings catch the buffs. If you slap them down randomly, you're leaving free stats on the table.
Cooldown Management: Harvest Timing & Efficiency
Resource nodes are sneaky - they regrow passively whether you're grinding pits or closed the game, but they won't harvest themselves. You've got to be there to collect, which creates a timing puzzle.
The U-shaped layout from earlier helps here too, since it cuts down the perceived cooldown between harvests by letting characters hit more nodes per pass. But that's just passive optimization.
Active ball management is where you really squeeze out efficiency. Catching and releasing balls manually can literally double your DPS compared to letting them bounce mindlessly at the bottom. It's more work, but the payoff is massive.
Some balls have specific timing windows you need to respect. The Bomb ball (Burn + Iron fusion) has a 3-second cooldown you can't spam, so you need to nail the rhythm to maximize its damage against resource nodes.
If you're really serious, there's a paid reset loop that lets you burn tokens to skip natural cooldowns entirely. It's not cheap, but it brings every node off cooldown immediately, which means you can chain harvests back-to-back.
Market Strategies: Late-Game Resource Conversion
The Market is your economy's engine, but it runs on cooldowns, which means bad timing will leave you drowning in unconverted resources while you wait for the next cycle.
Batch converting is the name of the game here. Don't waste Market activations on tiny amounts - wait until you're sitting on a stockpile, then dump it all at once. This minimizes downtime and keeps your gold flowing.
There's a clear hierarchy for what to convert and when. Gold Mines are direct collection, so they're always priority one, while Wheat Fields should be converted when you cross 500 units. Forests and Stone Quarries are for upgrades first, with excess getting sold later.
This creates a nasty feedback loop (the good kind): you harvest resources, convert them to gold, then spend that gold upgrading your nodes, which makes them produce even faster. Keep this cycle spinning and you'll snowball hard.
One warning though - don't get greedy chasing minor gold gains if it means leaving Juggler's Stone Resources untouched. Consistent clearing beats theoretical optimization every single time.
Evolution Path Resource Planning: Satan & High-Tier Evolutions
Let's talk about the endgame: Satan evolution. This isn't something you stumble into - it demands meticulous resource planning and perfect execution of multi-step fusion chains.
You'll need Charm, Dark, and Vampire balls as your foundation, and you have to protect these from enemy attacks from the earliest stages. Losing one sets you back significantly, which feels awful.
First, you need to unlock the Evolution Chamber after hitting the right progression thresholds, which opens up the multi-step chains required for Satan.
The biggest pitfall? Getting impatient and consuming your intermediate evolutions in other fusion recipes. You need to plan several steps ahead, or you'll find yourself short a key component and staring at a locked evolution screen.
Start hoarding those three ball types immediately, and don't touch them for anything else until you're ready for the full Satan chain.
Combat-to-Economy Feedback Loops: Ball Evolution Synergy
Your ball evolutions aren't just about combat - they directly feed your resource generation, which means every fusion choice ripples through your entire economy.
S-Tier combos like Black Hole (gravitational pull) and Nuclear Bomb (massive AOE) don't just kill stuff faster; they enable faster clears, which gives you more time to harvest resources between runs. That's the loop.
There are economy-focused character-ball pairings that specialize in grinding and base optimization. These prioritize combinations that generate extra resources passively, so you're making gold even while focusing on combat.
Elemental fusions that apply status effects - freezing, poison, burn, bleed - provide sustained damage that keeps you farming consistently across longer runs without burning out.
It all feeds back: better combat efficiency means more resources, which funds better evolutions, which creates even greater efficiency. Get this loop spinning and the game plays itself.
Progression Optimization: Build Order & Upgrade Strategy
Early Game (Levels 1-10): Resource Foundation
You can't just throw buildings down randomly and hope for the best. The early game has a very specific rhythm you need to follow, and it starts with Wheat Field. This is your food source, which means it's literally what keeps your base running and your Pitlings fed.
After that, you'll want a Forest because wood is the gateway to everything else - you can't build a Stone Quarry without it. Once you've got wood flowing, the Stone Quarry comes third, giving you the durability you'll need for upgrades and reinforcements.
Here's where things get interesting: the Gold Mine is fourth, not because gold isn't important, but because you need the foundation first. Gold is what lets you buy upgrades and access new areas, so you want it online before you hit the mid-game wall.
Finally, the Pitling House is your fifth priority, and this is what gives you your first actual character for automating resource harvesting. Don't rush this - the automation is useless if you don't have the production to back it up.
Mid Game (Levels 10-25): Economy Scaling & Key Unlocks
Once you're past level 10, your priorities shift hard toward economy. The single most important thing you can do is build seven Gold Mines in a U-shaped layout. This isn't a suggestion - this setup cranks out over 1,500 gold per harvest and becomes your entire economic backbone.
Now, here's what most people get wrong: don't upgrade your mines past level 1 initially. It's way better to have seven level 1 mines than three level 5 mines. The math just isn't there for upgrades early on.
After your gold engine is humming, you need the Matchmaker ASAP. This building is absolutely game-changing because it lets you run two characters at once, which means you're doubling your combat power and collection speed in every single run. The difference is night and day.
One last tip: when you build the Veteran's Hut, position it so it covers all your character buildings. The XP bonus is too good to waste on poor placement.
Late Game (Levels 25+): Stat Scaling & Utility
Late game isn't about more resources - it's about permanent power scaling. Your first priority should be the Evolution Chamber because this is where you create those busted S-Rank ball combinations like Satan. Without it, you're just spinning your wheels.
Next, you want the Antique Shop for its passive stat boosts that stack with your evolutions. But don't just plop it anywhere - put it right next to the Evolution Chamber. The proximity bonus adds +2% to all stats, and that compounds fast.
You'll also want a Mansion maxed out for that sweet 36 gold per minute, which funds all your late-game upgrades without you having to think about it.
And here's the kicker: once you get the Market, you can trade stone for gold. This means gold mines become way less critical in the true late game, and you can pivot your economy entirely.
Upgrade vs Build New: Cost-Benefit Analysis
This is where a lot of players bleed resources. As a general rule, you should upgrade buildings to level 5 as your baseline - that's the sweet spot for cost-to-benefit ratio. Anything beyond that starts hitting diminishing returns hard.
So when should you build new instead? Simple: when the upgrade cost exceeds what you'd pay for two or three new buildings. Early game, this almost always means building new stuff because you need diverse production.
Late game is different. Once you've got your foundation, you can start pushing select buildings to level 10+, but only if they have compounding benefits. Otherwise, you're just setting gold on fire.
Blueprint Drop Optimization: Character Rotation Strategy
Blueprint farming is its own mini-game, and you need a plan. First, check the bottom of the level select screen - it shows exactly how many blueprints are left in each area.
The most efficient method is running double characters while power-leveling characters you never use. You're knocking out two birds with one stone: farming drops and adding new characters to your roster.
Be aware that some blueprints have hidden requirements. The Desert Trophy Building Blueprint in Liminal Desert gives a permanent critical-hit boost, but it might not drop unless you're using specific characters.
Speaking of which, if you're going for speed, prioritize adding The Itchy Finger and The Makeshift Sisyphus to your roster first. They're S-tier for a reason and will make every future run faster.
One last thing: your final blueprint might require characters you don't even have access to yet, so don't bang your head against the wall if something won't drop. Check your roster first.
Advanced Techniques & Common Mistakes to Avoid
The difference between a good BallXPit run and a great one isn't just what you build - it's how you build it. These techniques will push your synergies to the limit, but only if you avoid the rookie errors that'll sink your progression.
Building Synergy Combos: Maximizing Combined Effects
Stacking synergies is where the real magic happens, and there are a few combos that'll make your runs absolutely sing.
First up, you've got the Captain's Quarters - this thing is a beast when you pair it with Intelligence and Strength buildings. Place it within range, and it amplifies those stat bonuses even further, which means your characters hit harder and last longer without any extra effort.
Then there's the Veteran's Hut paired with character houses. The Veteran's Hut hands out EXP bonuses to any character house in its radius, so your characters level up faster. Here's the kicker: higher character levels increase building range radius, so you're getting this snowball effect where everything just keeps getting better.
The Matchmaker is another game-changer. It lets you run two characters at once, which means you're doubling up on all those house synergies. Suddenly you're not just getting bonuses from one character house - you're getting them from two, and that adds up fast.
Finally, don't sleep on the Market with production buildings. The Market lets you convert excess Wheat, Wood, and Stone into Gold, which creates this beautiful resource loop where nothing goes to waste and your economy keeps humming along.
Resource Loop Optimization: 50,000 Gold in 5 Minutes
If you're tired of being gold-starved, here's the loop that'll fix your problems. The core of it is seven Level 3+ mines arranged in a U-shape. This setup pulls in 2,500-3,100 gold per harvest cycle, which is already solid.
But here's where it gets spicy. You can pay to reset harvests - the cost starts at 100g and doubles each time (100g → 200g → 400g, etc.). That sounds expensive, but there's a trick: the quick death reset. Just start a pit run and die immediately, and it resets your harvest cooldown for free.
So the loop becomes: harvest your U-shaped mines, die to reset, harvest again, repeat. While you're doing this, use the Market to convert any excess Wheat, Wood, or Stone into even more gold. Keep this cycle going, and you're looking at 50,000 gold in about five minutes. It's honestly kind of broken.
Mistake #1: Random Character House Construction
Alright, let's talk about what NOT to do. The biggest mistake I see people make is building character houses willy-nilly. This isn't a buffet - you can't just grab everything.
You need to prioritize the S-tier characters first. Pitling House should be your very first priority. The Pitling has this rapid XP gain passive that just snowballs your entire run. After that, go straight for Shieldbearer House - this gets you the tankiest character in the game with burn synergy that'll carry you through tough fights. Third on the list is Physicist House for the fire damage specialist.
Building low-tier character houses early is basically throwing resources into a pit. You're delaying your power spike for characters that won't matter in the long run.
Mistake #2: Delaying Gold Mine Expansion
Here's a hard truth: gold is EVERYTHING in the late game. It's the bottleneck for all your buildings and upgrades, and if you're sitting on one or two mines, you're just gimping yourself.
You need seven gold mines by mid-game, no exceptions. Seven mines in that U-shaped layout will generate 1,500+ gold per harvest, and that's your economic foundation. Without it, you can't afford the upgrades you need to progress.
And don't just build new mines - upgrade the ones you have. A Level 2 mine produces more than a second Level 1 mine, so always prioritize upgrades over expansion early on.
Mistake #3: Ignoring Stat Building Upgrades
Leaving your stat buildings at Rank D or C is like playing with one hand tied behind your back. These things scale from D → C → B → A → S, and S Rank gives you maximum permanent power.
Intelligence and Strength buildings are your highest priority because they give you permanent damage scaling. Every rank you skip is a massive chunk of damage and survivability you're just leaving on the table.
The community advice is spot on here: get your stat scaling buildings to S rank as soon as possible. It's not sexy, but it's the backbone of your entire build.
Mistake #4: Spread-Out Base Layouts
Last but not least, stop building wide. I know it feels good to have this sprawling base, but every tile of empty space is wasted ball trajectory. Spread-out layouts murder your ricochet potential and slow your resource collection to a crawl.
Instead, go compact. The U-shaped formation keeps your characters bouncing in tight loops, hitting buildings two or three times per harvest. Tight spacing creates these narrow corridors where characters just ping-pong back and forth, maximizing hits per launch.
Think of it this way: your base should be a pinball machine, not a suburban neighborhood.
Mastering BallXPit's base-building means prioritizing the 7-mine U-shape, unlocking key characters like the Pitling, and scaling your Intelligence stat for the endgame. Avoid the common pitfalls of random construction and spread-out layouts. By following these optimized strategies, you'll create a compact, synergistic powerhouse that fuels your progression and dominates every run.
More Ball-x-Pit Guides
Ball X Pit Rock Farming Guide: Maximize Your Rock Yield
Master rock farming in Ball X Pit with our comprehensive guide covering U-shaped layouts, upgrade priorities, character selection, and New Game+ strategies.
Ball X Pit Ultimate Guide: Character Matchups, Boss Strategies & Evolution Synergies
Master Ball X Pit with our complete guide covering character matchups, boss strategies, evolution synergies, and community-proven tactics for every stage from Skeleton King to Void Sovereign.
Ball X Pit Damage Formula Guide: Master Intelligence Scaling and Status Effects
Master Ball X Pit's hidden damage formula with Intelligence scaling, status effect stacking, and optimal build strategies for endgame dominance.
AI Tactical Companion
Consult with our specialized tactical engine for Ball-x-Pit to master the meta instantly.